HowTo configure Proxmox VE 7.1 for a dual network interface
provide network redundancy and load balancing to your virtualisation system

Passionate about science and technology and a strong believer the next big thing/think is yet to be discovered.
We have covered the Proxmox 7.1 installation in a previous article. In this article we will learn how to configure Proxmox to load balance two network interfaces (if our system has two NICs).
In our example system Proxmox VE (PVE) has identified two Network Interface Cards (NIC) the primary named eno1 and the secondary enp2s0. Note, by default, PVE will bind to the first PCIe NIC, unless you change the PVE management interface binding during the installation process of PVE.
So let's say during PVE installation we selected the following (reminder: our machine has two NICs, which PVE automatically named eno1 and enp2s0):
Management Interface: eno1 (automatically named and selected by PVE)
Hostname: pve-253 (information we specified/typed)
IP CIDR: 192.168.0.253/24 (information we specified/typed - static IP address of the management interface above)
Gateway: 192.168.0.1 (information we specified/typed - gateway IP address - the machine which allows Internet access through NAT - possibly your Internet router)
I assume you will be using Windows 10 and above for the following actions (not required, but I will be using Windows nomenclature - e.g. double click).
Access the Proxmox admin console https://192.168.0.253:8006 and login. You should see something similar to the following. You PVE management interface (eno1) is up and your secondary NIC (enp2s0) is down.

The default PVE network bridge is automatically named vmbr0. Anything involving networking in PVE (VMs and CTs) goes through the vmbr0 interface/bridge. To understand networking in PVE dig into the official PVE help file by clicking the ? Help button at the top right (see image above), while being in the Network section. PVE includes a full blown local manual for their product!
What we need to do is very simple. We need to create a network bond (to combine both NICs to appear as a single network interface), specify which bonding protocol we will use and assign the bond interface to vmbr0, so that all traffic goes through the bond.
Important note: any changes you make to the network is not applied until you click on the Apply Configuration button.
The steps are:
Disassociate vmbr0 from eno1, so later can associate bond0.
Double click on vmbr0 (or select vmbr0 and click Edit)

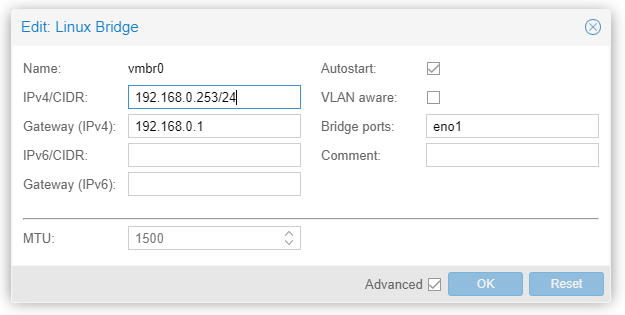
Remove eno1 and click OK.
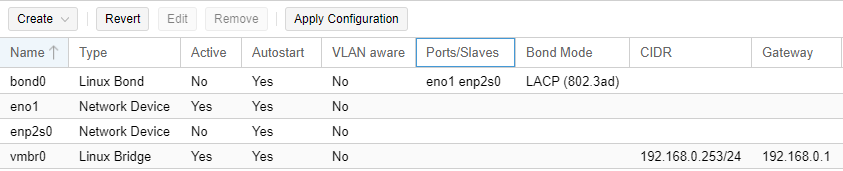
Your network configuration should be similar to the following image:

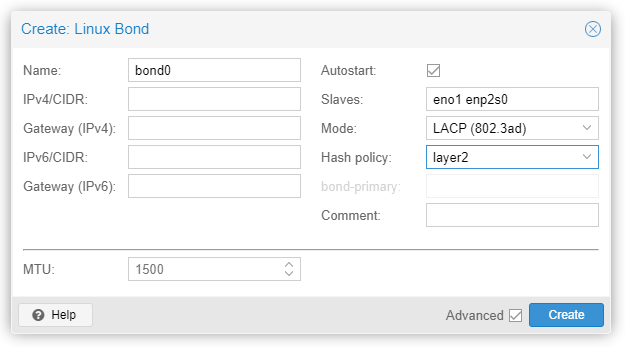
Create the bond: (click on Create -> Linux Bond)
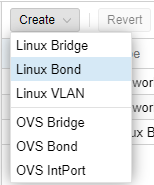
The bond should automatically be named bond0. The settings below are what I suggest you select. Note the NICs you want to bond in your system might be named differently (use the names your system is using). Separate NIC names with space - eno1 enp2s0 (no comma or other delimiters). Unless your Ethernet switch is old or very cheap, LACP should be a supported protocol on your physical Ethernet switch. For most people possibly layer2 should be the right Hash policy (will work with any Ethernet switch). If you have a L3 Ethernet switch you can select layer2+3 or layer 3+4 as your Hash policy. To find out more click on the ? Help button (bottom left). DO NOT assign any IP address as this will be done at the bridge level (vmbr0). Also make certain Autostart is enabled. Click Create.
Your network configuration should be similar to the following image:
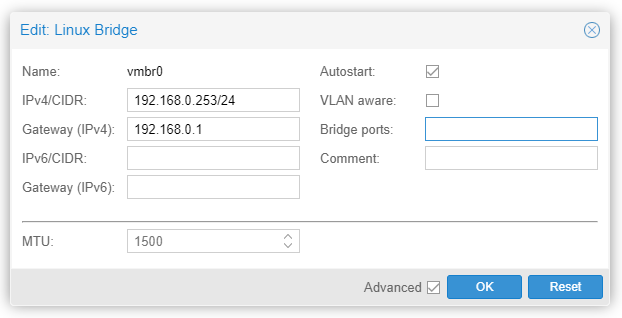
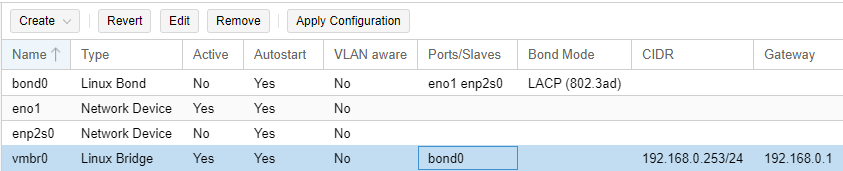
Double click on vmbr0 (or select vmbr0 and click Edit)
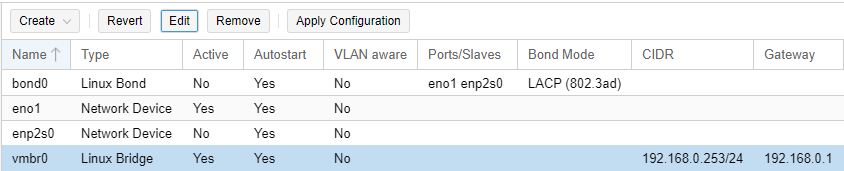
In Bridge ports type bond0 and click OK.

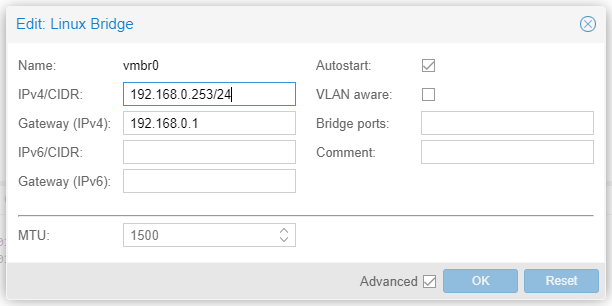
Your network configuration should be similar to the following image:
Click Apply Configuration
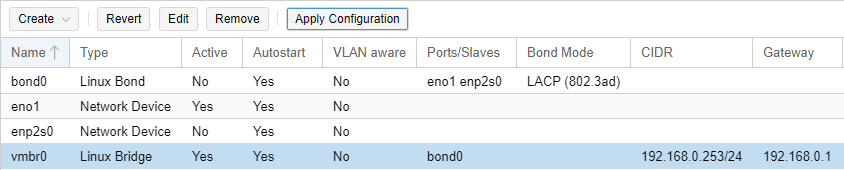
If everything went according to plan all 4 interfaces should now be active. I suggest to test, reboot Proxmox to make certain you can assess it: https://192.168.0.253:8006 and login (the "acid test").

If you found this article of any use please give it the thumbs up and if possible subscribe to our blog.